Quick Receipt
Initiate receipt from customers, advance receipt, and contra entries
Raaj
Last Update hace 3 años
In quick receipt, you can initiate receipt from customers, advance receipt, and contra entries. You can also make multiple receipts under different accounts, advance receipt, receipt from customers, etc. with a single quick receipt entry.
Essential Requirement
To create and use the quick receipt, it is essential and advisable to create the following
- Cash/Bank account
- Customer
- Accounts
Create Quick Receipt

- In the “Accounting” module, Select “Quick Receipt”.
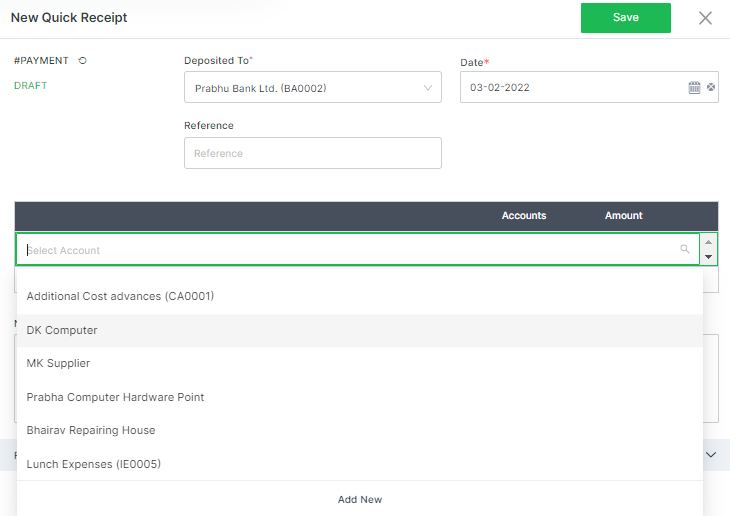
- Click on “+ Add New” to create a quick receipt.
- Unique # payment number will be generated automatically if set to auto in configuration or fill manually if set to manual.
- In the “Deposited To”, select the cash/bank from the drop-down list in which the receipt was made. If the cash/bank account is not previously created, you cannot create a new cash/bank account from the cash transfer entry. However, you can create a new cash/bank account in “Bank Accounts” under the “Accounting” module.
- Select the “Date” from the pre-designed calendar by clicking on the calendar icon.
- In reference, manually provide the information such as invoice details, cheque number, etc.
- Click on “Select Account”, choose from the list the customer or account head the payment has been received. For the Contra Entry, select the Cash in hands or Bank Accounts from the drop-down list. You can create a new account from “Add New” if not previously created. You can not however create a new cash/bank account or customer from the quick receipt.
- Enter the amount. For the multiple from the selected source or cash/bank, you can select multiple accounts, customer or cash/bank account in the same entry. You can add an individual description for the accounts selected by clicking on the arrow down icon.
- In the “Note”, provide the relevant information for the transaction/s.
- Select the reporting tag and custom fields if applicable.
- Click on the “Save” icon. Click on the desired action from the pop-up box or click elsewhere to save the payment as a draft. If saved as a draft, you can approve the receipt from the draft tab. OR
- Click on the “Reset” icon to clear all the fields and start again.
Options for Quick Receipts

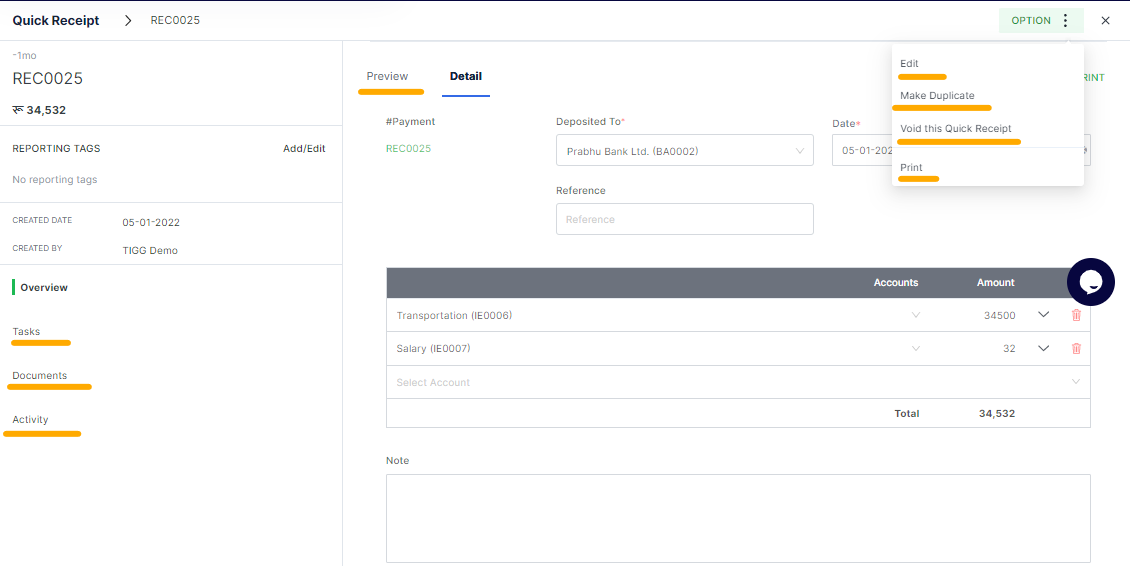
When a selected quick receipt is opened, options can be used to edit, make duplicates, void, print the selected receipt.
Quick Action Button: For the draft quick receipt entry, the quick action to “Approve” will be suggested.
Edit Quick Receipt– in this option, you can edit the previously created quick receipt.
Make Duplicate – if you select this option, a replica of the currently displayed quick receipt will be created as a new one. You can however still edit the details/information and save it as a quick receipt.
Void this Quick Receipt– This option nullifies/invalidates the currently selected quick receipt. Once a transaction is voided such transaction cannot be reverted later.
Print /PDF: For any document opened, may it be draft or approved, you can preview, print, or save as pdf. Tigg offers a pre-designed template for the user, however, you can design/change the templates from “Configuration” in “Printing Templates”
Field Description
| Field | Description |
|---|---|
| #Payment | Quick Receipt Number |
| Deposited To | Cash/Bank the payment is received into |
| Date | Date of receipt |
| Ref# | Reference |
| Account | Account for which payment is received |
| Amount | Amount received |
| Note | Note/relevant information |

