Bank Accounts
A financial account between a bank customer and a financial institution.

Raaj
Last Update för 3 år sedan
A bank account is a financial account between a bank customer and a financial institution. A bank account can be a deposit account, a credit card, or any other type of account offered by a financial institution.
A cash account, or cash book, may refer to a ledger in which all cash transactions are recorded. The cash account includes both the cash receipts journal and the cash payment journal.
In Tigg’s Bank Account, you can create and/or edit the bank or cash account to make receipts and payment entries.
Create New Bank Account
- In the Accounting Module, Go to “Bank Accounts”.
- To create a new bank account, click on “+Add New”.
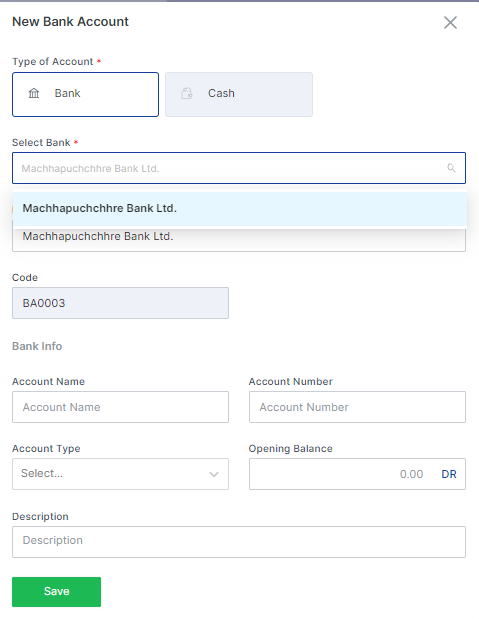
- Select “Bank” to fill in the details related to the bank account.
- Click on “Bank Name” to select the associated bank/financial institution from the dropdown list for the previously listed bank. If the bank name is not available in the dropdown list, you can create a bank name in “Banks” under “Apps” in the “Configurations” module. Moreover, the option to create a new “Bank Name” is not available from the “Charts of Accounts” module.
- In the “Display Name” field, type in the desired name to appear for the selected bank account.
- Select “Account Type” from the dropdown list.
- In the “Account Number” field, type in the bank account number.
- Type in the bank account name that is used to open an account with the bank/financial institution.
- In “Description”, type the relevant information as required.
- In “Opening Balance”, type the amount that is carried forward from the previous period. The balance is shown as “Dr” by default, however, you can change it to “Cr” by clicking on the “down arrow sign” and selecting from the list if applicable.
- Click on “Save” to finalize the bank account.
Create New Cash Account

- In the Accounting Module, Go to “Bank Accounts”.
- To create a new cash account, click on “+Add New”.
- Select “Cash” to fill in the details related to the cash account.
- Type in the desired “Account Name” to appear for the selected bank account.
- In “Description”, type the relevant information as required.
- In “Opening Balance”, type the amount that is carried forward from the previous period. The balance is shown as “Dr” by default, however, you can change it to “Cr” by clicking on the “down arrow sign” and selecting from the list if applicable.
- Click on “Save” to finalize the cash account.
Options for Bank Accounts
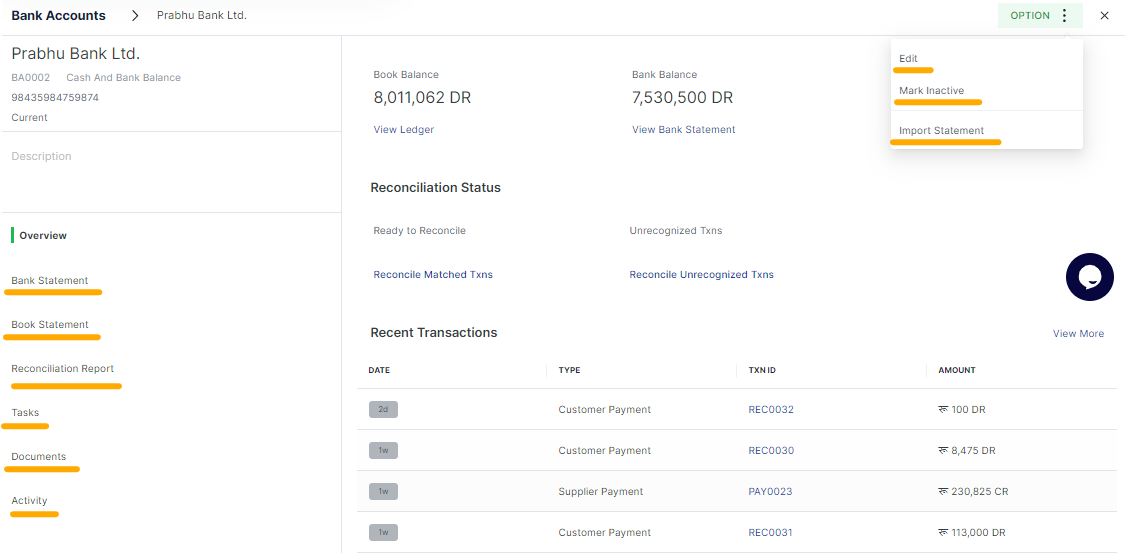
In Bank Accounts under the Accounting module, all the bank and cash accounts shall be displayed. Upon clicking on any bank and/or cash accounts, options to edit, mark as active or inactive and import statements will be accessible.
Edit Bank or Cash account– in this option, you can edit the selected bank or cash account.
Mark Inactive or active– in this option, You can change the status of the selected bank or cash account to active or inactive. If this option is selected, a dialog box will be prompted asking for permission to either continue or dismiss the selection.
If marked as inactive, no further entries can be posted under this bank/cash account but entries previously posted can be accessed. Once marked inactive, the options will appear to either change the status to “make active” or “delete” will appear.
Import Statement– Under this option, you can import the bank transactions from the bank statements directly which can be used for bank reconciliation purposes.
Bank Reconciliation
A bank reconciliation is the process of matching the balances in an entity's accounting records for a bank account to the corresponding information on a bank statement.
In Tigg, you can identify differences of balance in bank accounts and books of accounts,identify unrecognized transactions, reconcile bank balance and export the reports directly with a simple click.
In Tigg, you can reconcile the bank accounts by following three simple steps:
1. Import Bank Statements
- In the “Bank Accounts”, under “Accounting” Module, click on the bank account to open the account you want to reconcile.
- Under “option”, click on “Import Statement”.
- Click on “Download Upload Template” to download the sample template. You can download the “Single Amount Column” Template for bank statements with a single column for both deposit and withdrawal and the “Two Amount Column” Template for bank statements with separate columns for deposit and withdrawal. You can use any of the two templates as long as you fill the information as required.
- Upload the template file by clicking on “Click to Upload” and selecting the path to the file OR, dragging the file into the dotted box under “Upload your Bank Statement”.
- Upon successful upload of a bank statement, the validity of the transactions will be evaluated by Tigg automatically. If all the transactions are validated then you can click on “Confirm Upload” to finalize the entries. If any errors click on “Reupload New File” to go back to the upload page for bank statements.
2. Reconcile Matched Txns
- Under the “Reconciliation Status” in the selected bank account page, click on “Reconcile Matched Txns” to view the reconciled transactions.Tigg will identify all the matched transactions automatically.
- Click on the check box to select the identified transactions, click on “Reconcile” or “Reconcile All” to validate the transactions. If the suggested matched transactions is a false suggestion, click on “Ignore or Ignore All” to mark as “Unrecognized Txns”.
3. Reconcile Unrecognized Txns
- Under the “Reconcile Unrecognized Txns” in the selected bank account page, you can see the unrecognized, unmatched or ignored transactions. The list on the left half of the screen is for the unrecognized transactions from the bank statement. And on the right is for the unrecognized transactions from the tigg book.
- You can select the identified transactions on both sides by clicking on the transactions individually. The amount shall be displayed on top of the transactions. If the transactions are validated then click on “Reconcile”.
- To reconcile the multiple identified transactions, click on the multiple transactions at once. The total of the selected transactions on both sides shall be displayed above the transactions. If the total on both sides tallies, then you will be able to click on “Reconcile” to reconcile the transactions. To view the selected transactions in the isolated page, just click on the total amount and you will be directed to the separate page where only the selected transactions will be displayed separately.
- You can also use filter options such as “Amount”, “Type”, “Date” and “”Duration” to sort the transaction.